


Fishing Cabin
I'm currently building a 16'x16' timber framed fishing cabin. I'm cutting the timber frame at home, out of
hemlock timbers, and I thought it might be interesting for some people to see the process in a step by
step format. I particularly enjoy "timber framing", as the frame of a building is constructed similarly to a
traditional piece of furniture, with mortices and tenons, doveltails, and various other joints held together
with wooden pegs. This is as opposed to modern framing with dimensional lumber, plywood, nails, and
metal fasteners - which is designed to be covered up and never seen after it's initial construction. I have
nothing against modern framing - but appreciate the ability to do both. It makes me sad to see people
who know that they want to experience a traditional timber frame, but don't have the actual knowledge
and ability to do so. Thus they go to town with timbers, bolts, simpson hangers, etc. and end up with
something that is well intentioned and probably utilitarian, but could have been so much more elegant
with the application of some technologies that are thousands of years old.....
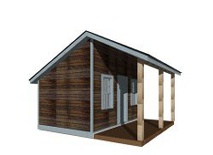
Back to the cabin: I was approached by some folks who had a general idea of a building that they wanted.
After spending some time listening to their wants and needs for this building, I submitted some
schematic drawings to them for consideration.
After some minor tweaks and changes, the clients approved a cabin design. At this point I started detailed
drawings of the frame.
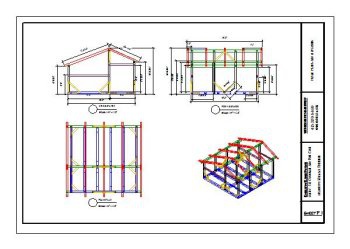
I design in a software environment called "vectorworks architect", which I believe to be the wave of the future
for designers and architects. I nstead of making 2D multiview drawings, as I would on paper or on autocad, I
build a 3D digital model of the building and building site. I then extract views of that model for plans,
elevations, sections, and 3D renderings. This is a more intuitive process than 2D drawing and I believe
accesses creative design solutions that other methods would not tend to encouage.
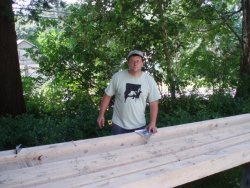
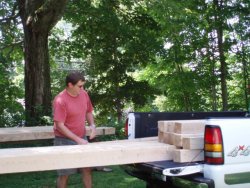
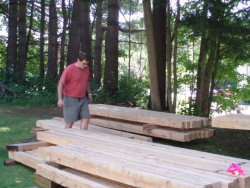
After designing the frame in detail, I developed a "cutting list" of timber and called my local lumber supplier to
cut my timbers. These were hemlock 5x6's, 5x5's, 4x5's, 3x4's.... The biggest pieces were 5x6x18' top plates -
which weighed in excess of 200 lbs. apiece in their wet state. This frame has about the biggest timbers in it
which I can handle by myself. The lumber was ready 2 days later and I headed off to pick it up. It was 3 trips of
about 3 hours apiece and in retrospect it would have made sense to have them deliver it.
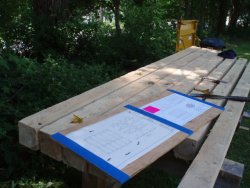
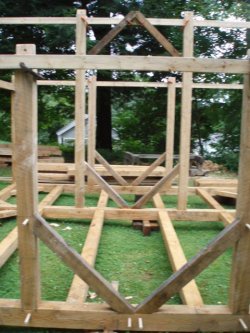
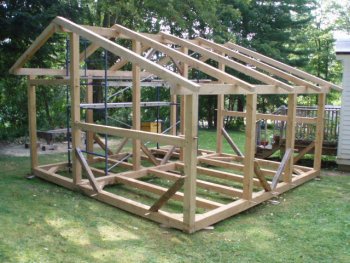
With the timber here, framing design complete, and level spot to erect the frame as I cut the pieces, I was ready
to start laying out the frame. I started with the deck and I planned to erect each section as I cut the pieces - so
as to ensure the final fit of the joints. With buildings with larger timbers, I don't usually have this luxury. After
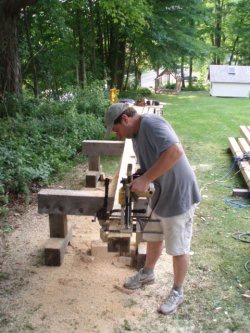
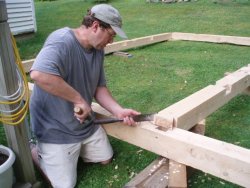
laying out the deck timbers (sills, summer beam, and joists), I started cutting the mortices, tenons, and
dovetails. The layout and the cutting needs to be very accurate (within 1/32), as the frame will be not only
structural, but also asthetic.
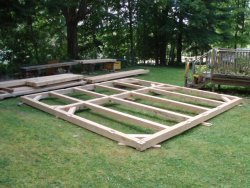
After cutting all of the deck timbers, I start to assemble - fine tuning joints where necessary. Eventually I
assemble the entire deck. Rough times that I have into the frame up to now are: meet with clients and talk back
and forth - 3 hours, schematic drawings - 3 hours, final design 12 hours, get timbers 9 hours, set up building site
3 hours, layout deck 6 hours, cut deck 16 hours, assemble deck 2 hours. total - 54 hours
I should mention that since this frame will be dis-assembled once it's completed, to be delivered to the client's
house, all joints are clearly labeled. There are 172 joints in this frame, so labeling is pretty important. After fitting
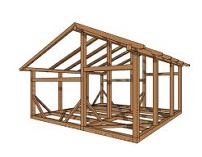
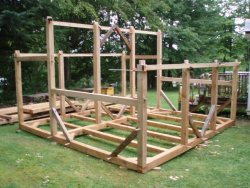
deck together, I go through layout, cutting, and assembly of the posts, diagonal braces, and tie beams - basically
completing everthing below the top plates.
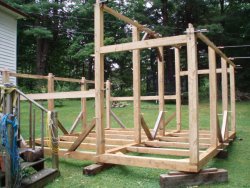
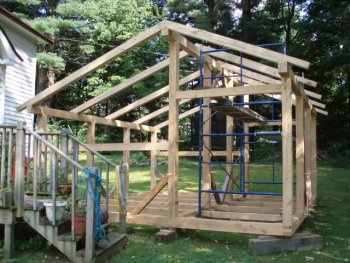
After 4 days of dodging showers, working in light rain, and heinous heat and humidity, I have the 3 rows of
posts up, along with their diagonal braces and tie beams. The last step for this frame will be top plates
(5x6x18') and rafters (4x5). If you look at placement of the braces and tie beams, you'll see that it's an exercise
in having enough of them to stabilize the building, while keeping them out of the way of doors and windows
and not taking too much meat out of critical parts of the frame.
I've gotten some questions about why the joists are tapered at the ends. The reasons are: 1- They need to be
reduced in depth so that where they knotch into the sills and summer beam doesn't remove too much
structure from sills and beam, 2- By tapering back gently instead of a stepped cuts, the joists are less likely to
split, 3- The main force that the joists need to counter is deflection, which is most pronounced in the center of
spans, and thus they need to be thickest in the middle. When I get the frame together, I'll take a picture of
each of the joints and explain why I used them. FYI, the best music to listen to while cutting a timber frame is
Gypsy Jazz - Django, Oscar Aleman, Jimmy Rosenberg....
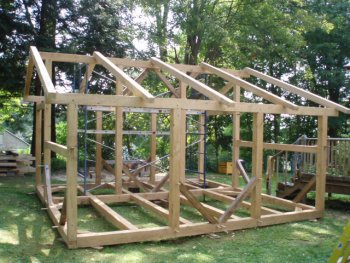
I spent the day today (92 and humid in the shade) cutting the top plates. The plates are 5x6x18' and have housed
mortices on the underside to receive the tenons from the posts, and knotches on top to receive the rafters. My 15
year old son helped me wrestle the plates onto the staging and I'll get some help to set them tomorrow. My last
task is to cut the rafters and then she's complete. The frame's new owners will help me dis-mantle the frame so
that they will understand how to re-assemble it on their property.
I'm entering home stretch b9/7/2009 4:03:21 PM
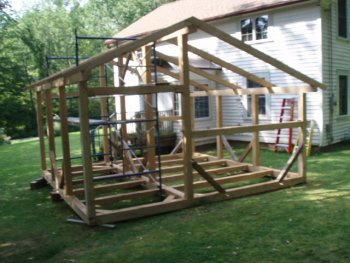
My friend Dave stopped over this morning to help me put the top plates in place. He's a famous TV star, so I can't
say his last name without sounding like a name dropper. Fortunately the plates dropped right in without mishap -
always a tense moment when putting something heavy, with lots of joints, in place. It's 90+ and humid in the
shade - another sweaty august day in the Berkshires. I have the first 2 rafters cut and in place. They are knotched
into the top plates and held to each other with bridle joints. The following pics should illustrate the rafter
knotchs, the bridle joint, and the posts morticed and tenoned into the top plate. I will also mention that when
finally assembled on site, the frame is "draw pegged" together. The holes through the mortices and tenons are
offset (in this case about 3/16") so that the peg going through the holes pulls the joint tight. The flexibility of the
white oak pegs keeps the joints tight as the frame drys out and all the timbers shrink.
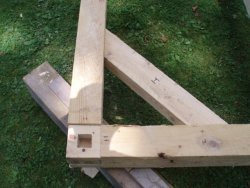
Because this building is relatively simple, there are a limited number of types of joints. These include: housed
mortice and tenon, cog, dovetail, slip joint, dovetail, bridle joint, rafter to top plate knotch, and tie beam joint.
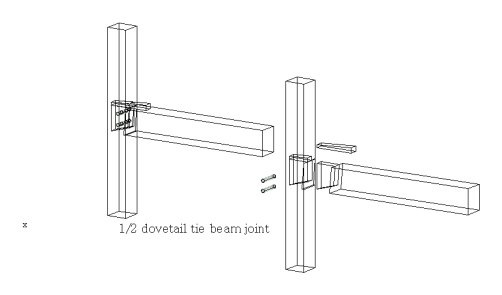
Most of the joints mentioned work best where the main stress to the joint is compressive or shear. Most timber
frame joinery doesn't hold up well to a tensile (pulling) load. In "tie beams" (the 3x5's that run horizontally from
front to back of this frame) the load is at least 50% tensile. A relatively good joint for this is a 1/2 dovetail. The
1/2 dovetailed tenon is placed in the mortice and then wedged into place and pegged. The added friction of the
1/2 dovetail more than doubles the tensile strength of the pegs in the tenon.
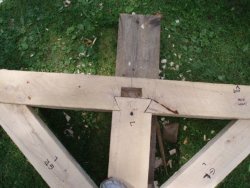
As I look at this relatively small and simple frame, I'm reminded that even a small timber project tends to have a
variety of joints. In this one I'm counting at least 8. This next joint forms the outside bottom corners of the frame.
The 2 sills come together in a slip joint, or open mortice and tenon and the corner post comes down with a tenon
into a mortice in the middle of the slip joint. The post sits in a 1/2" deep "housing", which helps to keep it in
place and straight, and the tenon from the corner post locks the slip joint together. Here's a drawing that should
show you what's going on.
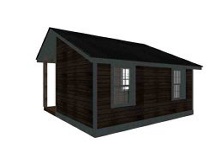
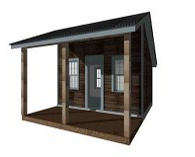
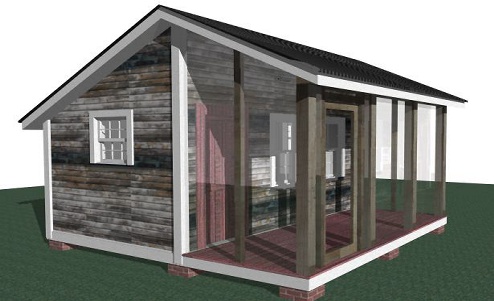
Here's a rendering of cabin as it will be finished.